Decorating tin cans is a fun and creative way to upcycle old containers and transform them into unique pieces of art. Whether you’re looking to make a statement piece for your home or create personalized gifts for friends and family, decorating tin cans is a great way to unleash your creativity. In this article, we’ll share some handy tips and techniques for decorating tin cans, so you can create beautiful and functional pieces that everyone will love. Let’s get started!
Choosing the Right Tin Cans for Decoration
Factors to Consider When Selecting Tin Cans
When it comes to decorating tin cans, selecting the right tin cans is crucial to achieve the desired outcome. Here are some factors to consider when selecting tin cans for decoration:
- Size: The size of the tin can is an important factor to consider. The size of the tin can will determine the amount of space available for decoration. It is important to choose a tin can that is large enough to accommodate the design you have in mind.
- Shape: The shape of the tin can is also an important factor to consider. The shape of the tin can will affect the way the design will look. For example, a round tin can may be better suited for a certain design than a rectangular tin can.
- Material: The material of the tin can is also an important factor to consider. Some tin cans are made of thicker metal than others, which may affect the way the design is applied. It is important to choose a tin can that is made of a material that can withstand the decoration process.
- Durability: The durability of the tin can is also an important factor to consider. The tin can should be able to withstand the decoration process and last for a long time. It is important to choose a tin can that is sturdy and durable enough to hold the design for a long time.
- Design: The design of the tin can is also an important factor to consider. The design of the tin can will affect the way the decoration will look. It is important to choose a tin can that has a design that can be enhanced by the decoration process.
By considering these factors, you can select the right tin cans for decoration and achieve the desired outcome.
Tips for Choosing the Perfect Tin Cans for Your Project
When it comes to decorating tin cans, the right choice of tin can is crucial to the success of your project. Here are some tips to help you choose the perfect tin cans for your project:
- Consider the size of the tin can: The size of the tin can will affect the overall look and feel of your project. Consider the amount of space you have available for your project and choose a tin can that will fit comfortably without overwhelming the space.
- Choose the right material: Tin cans come in a variety of materials, including aluminum, steel, and tin-plated steel. Consider the look and feel you want to achieve and choose a material that will best achieve that look.
- Consider the shape of the tin can: The shape of the tin can can also affect the overall look and feel of your project. Consider the shape of the tin can and how it will fit into your design.
- Check for any imperfections: Inspect the tin can for any imperfections, such as dents or scratches. These imperfections can affect the overall look of your project and may require additional work to hide them.
- Consider the intended use of the tin can: If you are decorating a tin can that will be used for a specific purpose, such as a pencil holder or a vase, consider the functionality of the tin can and choose one that will work well for that purpose.
By following these tips, you can choose the perfect tin cans for your project and ensure that your decorating project turns out beautifully.
Preparing the Tin Cans for Decoration
Cleaning and Priming the Tin Cans
Before you start decorating your tin cans, it’s important to properly prepare them. This involves cleaning and priming the cans to ensure that they are smooth and even, and that the paint or other decorative materials will adhere properly. Here are some tips for cleaning and priming your tin cans:
Cleaning the Tin Cans
- Remove any labels or stickers from the tin cans using a scraper or a utility knife.
- Wash the tin cans with soap and water to remove any dirt or debris.
- Dry the tin cans thoroughly with a clean cloth or paper towels.
Priming the Tin Cans
- Lightly sand the tin cans with fine-grit sandpaper to remove any imperfections or rough spots.
- Apply a primer to the tin cans using a brush or a roller. Choose a primer that is compatible with the paint or other decorative materials you will be using.
- Allow the primer to dry completely according to the manufacturer’s instructions. This may take several hours or overnight.
By following these steps, you will ensure that your tin cans are clean and smooth, and that the paint or other decorative materials will adhere properly. This will help you achieve a professional-looking finish and unleash your creativity when decorating your tin cans.
Masking and Protecting the Areas You Don’t Want to Paint
When it comes to decorating tin cans, one of the most important steps is to mask and protect the areas you don’t want to paint. This is crucial to ensure that your design comes out looking neat and professional. Here are some tips to help you achieve this:
- Use masking tape: Masking tape is an essential tool when it comes to decorating tin cans. It’s easy to use and can be found at any craft store. Simply cut the tape to the desired length and stick it onto the area you want to protect. This will keep the paint from going onto the area you don’t want to paint.
- Use painter’s tape: Painter’s tape is similar to masking tape but is designed specifically for painting. It’s less likely to leave residue behind and can be easily removed without damaging the paint.
- Use masking fluid: Masking fluid is a liquid that you can use to protect areas of your tin can. Simply apply it to the area you want to protect and let it dry. Once it’s dry, you can remove the fluid with a paper towel, leaving the area around it free from paint.
- Use a plastic bag: If you don’t have any masking tape or fluid, you can use a plastic bag to protect the area you don’t want to paint. Simply cut the bag to the desired size and shape, and secure it around the tin can with some tape.
No matter which method you choose, it’s important to make sure that the masking material is securely in place before you start painting. This will help ensure that your design comes out looking great, and that you don’t end up with any unwanted paint on your tin can.
Painting Techniques for Tin Cans
Painting with Acrylic Paints
Acrylic paints are a popular choice for painting tin cans due to their versatility and ease of use. Here are some tips and techniques for painting tin cans with acrylic paints:
Choosing the Right Surface for Painting
Before painting your tin can, it’s important to ensure that the surface is clean and free of any dirt, grease, or other debris. You can use a damp cloth to wipe down the surface, and then let it dry completely before painting. It’s also a good idea to prime the surface with a layer of gesso or white paint to create a smooth, even surface for the acrylic paint to adhere to.
Preparing Your Paint
Acrylic paint can be thin or thick, depending on how much water you add to it. To achieve a smooth, even coat of paint, it’s important to thin your paint to the consistency of heavy cream. You can also add a small amount of water to the paint to create a transparent or watery effect.
Painting Techniques
Once your surface is prepared and your paint is thin, you can start painting your tin can. Here are some techniques to try:
- Painting in layers: Apply a thin layer of paint to your tin can, allowing each layer to dry completely before adding additional layers. This will help create a smooth, even finish.
- Creating texture: Experiment with different texture techniques, such as drips, splatters, or sponging, to add interest to your tin can.
- Adding details: Use a small brush or marker to add details to your tin can, such as letters, designs, or patterns.
- Using different colors: Mix and match different colors to create a unique and eye-catching design on your tin can.
By following these tips and techniques, you can create a beautifully decorated tin can that showcases your creativity and style.
Painting with Spray Paint
If you’re looking for a quick and easy way to paint your tin cans, then spray paint is the way to go. Spray paint is a fast-drying, durable, and versatile option that can transform any tin can into a work of art. Here are some tips and techniques to help you get started with spray painting your tin cans:
Choosing the Right Spray Paint
Before you start spray painting your tin cans, it’s important to choose the right spray paint. There are many different types of spray paint available, including acrylic, enamel, and latex. The type of spray paint you choose will depend on the type of surface you’re painting and the desired finish. For example, if you want a glossy finish, then you should use a glossy spray paint. If you want a matte finish, then you should use a matte spray paint.
Preparing Your Tin Cans for Spray Painting
Before you start spray painting your tin cans, it’s important to prepare the surface. This includes cleaning the tin cans thoroughly to remove any dirt, dust, or debris. You should also sand down any rough or uneven surfaces to ensure that the paint adheres evenly. Once you’ve prepared the surface, you can start spray painting your tin cans.
Tips for Spray Painting Your Tin Cans
Here are some tips to help you get the best results when spray painting your tin cans:
- Hold the can about 6 to 8 inches away from the surface and spray in a smooth, even motion.
- Cover the area you want to paint thoroughly, but don’t overdo it. It’s better to apply multiple thin coats than one thick coat.
- Allow the paint to dry completely between coats.
- Don’t use too much pressure when spraying, as this can cause the paint to splatter or drips.
- Always spray in a well-ventilated area and wear a mask to avoid inhaling the fumes.
Techniques for Spray Painting Your Tin Cans
Here are some techniques you can use to add interest and dimension to your spray-painted tin cans:
- Use different spray paint colors and finishes to create a unique design.
- Apply a light coat of spray paint and then use a cloth or brush to create a textured effect.
- Experiment with different spray paint techniques, such as stenciling or sponging, to create a more interesting design.
Overall, spray painting is a fast and easy way to decorate your tin cans. With the right preparation and technique, you can create beautiful and unique designs that will add personality and style to any room.
Using Decals and Stickers for Easy Decoration
When it comes to decorating tin cans, using decals and stickers is a convenient and effortless method that requires no special skills or tools. This technique is ideal for those who want to add a personal touch to their tin cans without spending too much time or effort. Here are some tips on how to use decals and stickers for easy decoration:
- Choose the right size and shape of decal or sticker: Decals and stickers come in various sizes and shapes, so it’s important to choose one that fits the size and shape of your tin can. Measure the dimensions of your tin can and compare them with the available decals and stickers to find the perfect match.
- Clean the surface of the tin can: Before applying the decal or sticker, make sure that the surface of the tin can is clean and free from any dirt, dust, or grease. Use a soft cloth or sponge to wipe away any impurities, and make sure that the surface is dry before applying the decal or sticker.
- Apply the decal or sticker: Gently peel off the backing paper of the decal or sticker and carefully place it onto the surface of the tin can. Use a straight edge or ruler to ensure that the decal or sticker is straight and level. If needed, use a pair of scissors to trim the edges of the decal or sticker to fit the size of the tin can.
- Smooth out any bubbles or wrinkles: If there are any bubbles or wrinkles in the decal or sticker, use a credit card or similar flat object to gently smooth them out. Make sure that the decal or sticker is fully adhered to the surface of the tin can and that there are no air bubbles trapped underneath.
- Allow the decal or sticker to dry: Depending on the type of decal or sticker you’re using, it may take a few minutes to an hour to fully dry. Make sure that the decal or sticker is completely dry before handling the tin can or placing it in storage.
By following these simple steps, you can easily add a personal touch to your tin cans using decals and stickers. Whether you’re looking to create a custom design or simply add a fun and colorful accent, this technique is a quick and easy way to decorate your tin cans.
Embellishing the Tin Cans
Adding Glitter, Glue, and Glitter Glue
Transforming tin cans into beautiful pieces of art is an excellent way to recycle and upcycle materials. Glitter, glue, and glitter glue are essential tools for decorating tin cans. They can be used to create various designs and patterns that add visual appeal to the tin cans.
Here are some tips for using glitter, glue, and glitter glue when decorating tin cans:
- Choose the right type of glitter: There are many types of glitter available, such as craft glitter, fine glitter, and chunky glitter. When decorating tin cans, it is essential to choose the right type of glitter based on the design and pattern you want to create.
- Apply a base coat: Before applying glitter to the tin can, it is recommended to apply a base coat of paint or glue to provide a smooth surface for the glitter to adhere to. This will help the glitter stick to the tin can and prevent it from falling off easily.
- Apply the glitter: Once the base coat is dry, you can start applying the glitter to the tin can. You can use a brush or your fingers to apply the glitter evenly over the surface of the tin can. Make sure to shake the glitter before using it to ensure an even distribution of color.
- Use glitter glue for more extensive coverage: If you want to cover a larger area of the tin can with glitter, you can use glitter glue instead of regular glitter. Glitter glue provides more extensive coverage and is easier to apply than regular glitter.
- Allow the glitter to dry: After applying the glitter to the tin can, allow it to dry completely. This will ensure that the glitter adheres properly to the surface of the tin can and creates a durable and long-lasting design.
By following these tips, you can create beautiful and unique designs on your tin cans using glitter, glue, and glitter glue. These materials are inexpensive and readily available, making them an excellent choice for decorating tin cans.
Using Ribbons, Laces, and Other Textured Materials
- Introduction: The use of ribbons, laces, and other textured materials can add a touch of elegance and sophistication to your tin can decorations. These materials can be used to create intricate patterns and designs that enhance the visual appeal of your tin cans.
- Ribbons: Ribbons come in a variety of colors, patterns, and textures, making them a versatile material for decorating tin cans. You can use ribbons to create bows, loops, and other decorative elements that add visual interest to your tin cans.
- Laces: Laces can be used to create delicate and intricate patterns on your tin cans. They can be used to create lace borders, floral designs, and other decorative elements that add a touch of elegance to your tin can decorations.
- Other Textured Materials: There are many other textured materials that you can use to decorate your tin cans, such as burlap, twine, and yarn. These materials can be used to create unique and creative designs that add a personal touch to your tin can decorations.
- Tips and Techniques: When using ribbons, laces, and other textured materials to decorate your tin cans, here are some tips and techniques to keep in mind:
- Experiment with different materials to find the ones that work best for your design.
- Use a variety of colors and patterns to create a cohesive and visually appealing design.
- Pay attention to the texture of the materials you use, as this can add depth and dimension to your design.
- Use your materials creatively to create unique and eye-catching designs that showcase your creativity.
Attaching Charms, Buttons, and Other Small Decorations
- Introducing the art of embellishing tin cans with charms, buttons, and other small decorations.
- The versatility of these items, which can be easily attached to create a personalized design.
- Exploring the different types of charms, buttons, and decorations available for tin can decoration.
- Techniques for attaching these items securely to the tin can surface.
- Tips for achieving a balanced and visually appealing design with small decorations.
- Ideas for incorporating sentimental or thematic elements into the tin can design.
- Examples of successful tin can decoration projects featuring charms, buttons, and other small decorations.
- Encouraging readers to experiment with different decorations and techniques to create their own unique tin can designs.
Innovative Ideas for Decorating Tin Cans
Creating Tin Can Lamps
Decorating tin cans can be a fun and creative activity that yields beautiful results. One popular way to decorate tin cans is by turning them into lamps. Here are some steps to follow to create your own tin can lamps:
Step 1: Gather Your Supplies
To create a tin can lamp, you will need the following supplies:
- Tin can (clean and dry)
- Scissors
- Electrical tape
- String or twine
- A small light bulb
- A lamp socket
- A piece of cardboard or foam board
- Paint or markers (optional)
Step 2: Cut the Tin Can
Use scissors to cut the top off of the tin can, creating a flat surface. Be sure to cut the can in a straight line, as this will affect the appearance of the lamp. If you want to add more visual interest to the lamp, you can also cut the sides of the can to create a more unique shape.
Step 3: Spray Paint the Tin Can
If you want to change the color of the tin can, you can spray paint it with a can of paint. Choose a color that complements the decorations you plan to add to the lamp. If you prefer, you can also use markers to decorate the tin can instead of spray paint.
Step 4: Attach the Light Bulb and Socket
Attach the small light bulb to the top of the tin can using electrical tape. Then, attach the lamp socket to the top of the light bulb. This will allow you to plug the lamp into an outlet and turn it on and off.
Step 5: Add Decorations
Use string or twine to add decorations to the tin can lamp. You can create patterns or designs by weaving the string in and out of the tin can. If you have any small decorations, such as beads or buttons, you can attach them to the tin can using electrical tape. You can also use paint or markers to add additional decorations to the tin can.
Step 6: Hang the Lamp
Once you have finished decorating the tin can lamp, you can hang it from the ceiling or place it on a tabletop. Use the string or twine that you used to decorate the lamp to create a hanger, or attach a piece of cardboard or foam board to the bottom of the tin can to create a base for the lamp.
With these simple steps, you can create a beautiful tin can lamp that adds a unique touch to any room. So, get creative and start decorating your tin cans today!
Transforming Tin Cans into Storage Containers
When it comes to repurposing tin cans, transforming them into storage containers is a great idea. Not only does this help you declutter your space, but it also adds a touch of personalization to your home. Here are some tips and techniques to help you get started:
Supplies:
- Tin cans
- Paint or spray paint
- Sandpaper
- Mod podge or a similar adhesive
- Ribbon or twine (optional)
Steps:
- Clean the tin can thoroughly with soap and water, and then sand it down to remove any labels or rust.
- Apply a layer of paint or spray paint to the tin can, and let it dry completely.
- Once the paint is dry, apply a layer of mod podge to the tin can, and let it dry completely.
- Cut out a piece of cardboard or foam board to fit the lid of the tin can, and glue it in place.
- Decorate the lid with scissors, ribbon, or twine (optional).
- Fill the tin can with small items, such as paper clips, binder clips, or batteries.
- Store the tin can in a convenient location, such as a desk or bookshelf.
By following these simple steps, you can transform a tin can into a stylish and functional storage container that will add a personal touch to your home. So why not give it a try and see what you can create?
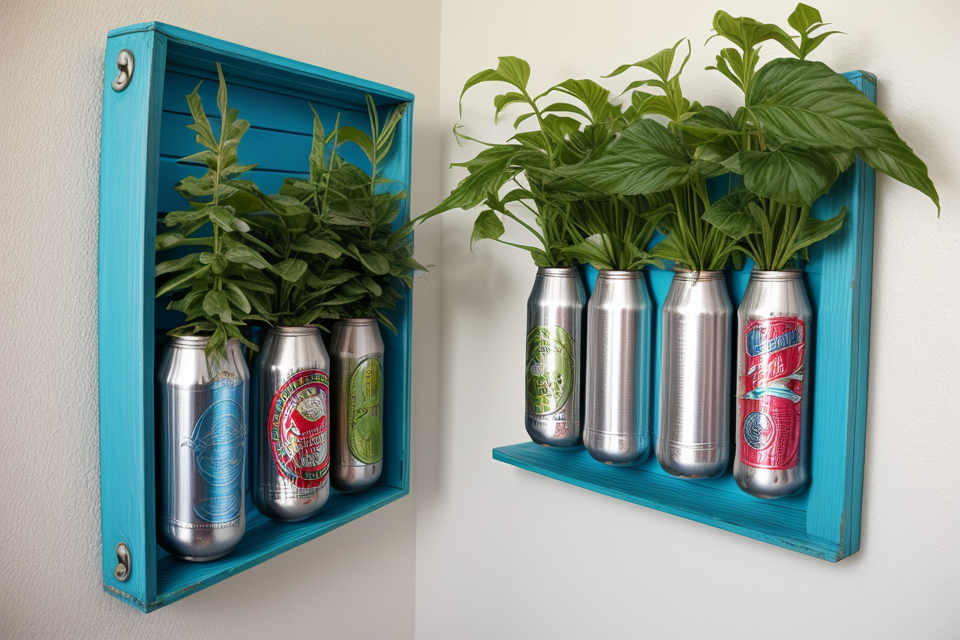
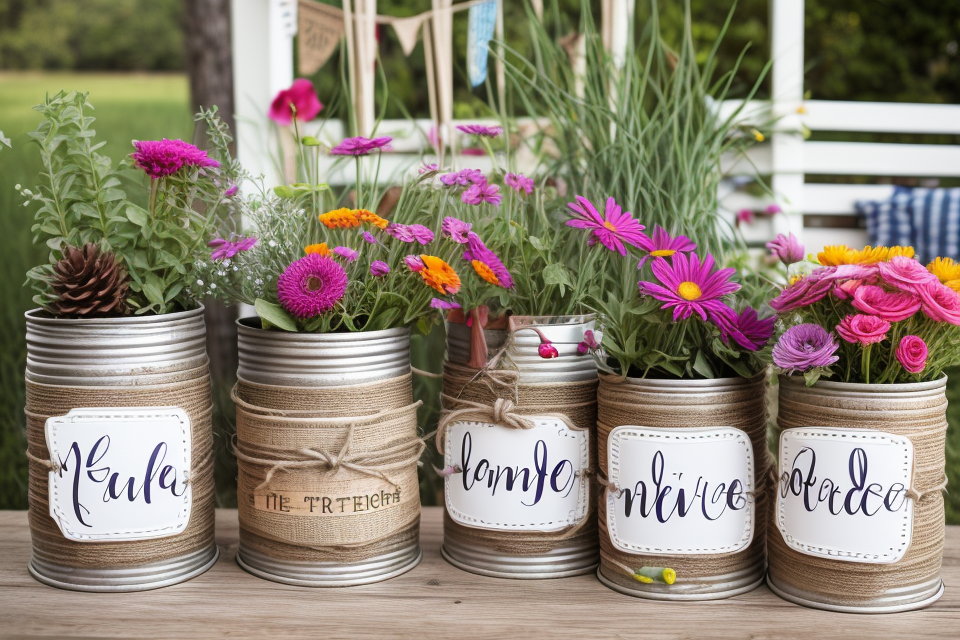
Using Tin Cans as a Base for DIY Planters
Decorating tin cans not only adds a touch of personalization but also provides endless possibilities for repurposing. One such idea is transforming tin cans into planters for your indoor or outdoor garden.
Why Use Tin Cans as Planters?
Tin cans are not only sturdy and durable but also environmentally friendly. They can be easily cleaned and sterilized, making them ideal for planting seeds or small plants. Moreover, tin cans come in various sizes, which means you can customize the size of your planter according to your preference.
Preparing the Tin Can for Planting
Before you start planting, you need to prepare the tin can. First, remove the label from the tin can using a scraper or a razor blade. Next, wash the tin can thoroughly with soap and water to remove any residue. Finally, dry the tin can completely before proceeding with the next step.
Decorating the Tin Can
Now that your tin can is clean and ready for planting, it’s time to decorate it. You can use acrylic paint or spray paint to add color and design to your tin can. Alternatively, you can also decorate the tin can with stickers, markers, or fabric. The possibilities are endless!
Planting Your Seeds or Small Plants
Once your tin can is completely dry and decorated, it’s time to plant your seeds or small plants. You can use soil or potting mix to fill the tin can. Make sure to poke holes in the bottom of the tin can to allow excess water to drain away.
Caring for Your Plants
Finally, make sure to water your plants regularly and place them in a location that receives sufficient sunlight. You can also add fertilizer to the soil to promote growth. With proper care, your tin can planter can thrive for years to come.
Tips for a Professional-Looking Finish
Sanding and Distressing for a Vintage Look
- Sanding and distressing are techniques used to give tin cans a vintage or weathered look.
- To achieve this look, start by sanding the surface of the tin can with a fine-grit sandpaper.
- This will help to remove any imperfections and create a smooth surface.
- After sanding, wipe away any dust with a damp cloth.
- Once the surface is smooth, apply a layer of paint or a patina solution to the tin can.
- You can also use a technique called “distressing” to create a more worn or aged look.
- This can be achieved by applying a dark stain or ink to certain areas of the tin can, then wiping it off to reveal the metal underneath.
- Distressing can also be done by scratching or gouging the surface of the tin can with a tool or your fingers.
- This will create small indentations and imperfections, giving the tin can a more vintage or rustic look.
- Be sure to experiment with different techniques and see what works best for your project.
- With these techniques, you can easily transform a plain tin can into a unique and stylish piece that is perfect for storing treats or displaying on a shelf.
Applying Topcoats and Sealants for a Glossy Finish
Applying topcoats and sealants is a crucial step in achieving a professional-looking finish when decorating tin cans. Topcoats and sealants are designed to protect and enhance the appearance of the surface they are applied to. They can help to even out the color, provide a glossy finish, and prevent the paint from chipping or fading over time.
Here are some tips for applying topcoats and sealants to your tin can project:
- Choose the right topcoat or sealant for your project. There are many different types of topcoats and sealants available, each with its own unique properties. Consider the specific needs of your project when choosing the right product.
- Stir the topcoat or sealant thoroughly before use. This will ensure that the product is well mixed and evenly distributed, resulting in a consistent finish.
- Apply the topcoat or sealant in thin, even coats. This will help to prevent drips, runs, and other defects that can ruin the finish. Allow each coat to dry completely before applying the next coat.
- Use a paintbrush or foam roller to apply the topcoat or sealant. A foam roller is especially useful for large surfaces, as it can cover a lot of ground quickly and evenly.
- If you’re using a spray can, make sure to use it in a well-ventilated area and wear protective gear such as a mask and goggles. Spray cans can produce harmful fumes, so it’s important to take proper precautions.
- Once the topcoat or sealant is dry, gently sand the surface with fine-grit sandpaper to remove any imperfections and create a smooth finish.
By following these tips, you can achieve a professional-looking finish on your tin can project that will last for years to come.
Displaying Your Decorated Tin Cans with Pride
Once you have finished decorating your tin cans, it’s time to show them off! Here are some tips for displaying your decorated tin cans with pride:
- Display them in a visible area: Place your decorated tin cans in a visible area of your home or office, such as a bookshelf or coffee table. This will allow others to see and appreciate your creative work.
- Create a themed collection: Group your decorated tin cans together based on a theme, such as holidays or seasons. This will create a visually appealing display that showcases your creativity.
- Use them as gift containers: Use your decorated tin cans as gift containers for special occasions, such as birthdays or holidays. This will add a personal touch to your gifts and make them stand out.
- Take photos and share them on social media: Take photos of your decorated tin cans and share them on social media. This will allow others to see your work and inspire them to try their own tin can decorating projects.
By following these tips, you can display your decorated tin cans with pride and showcase your creativity to others.
Summing Up the Best Tips and Techniques for Decorating Tin Cans
After trying out various techniques and tips, we have come up with a list of the best methods for achieving a professional-looking finish when decorating tin cans. These tips will help you create unique and beautifully decorated tin cans that are perfect for gift-giving or adding a personal touch to your home decor.
- Use a Primer: Applying a primer to your tin can before painting or decorating it will ensure that the paint adheres well and the finish looks smooth and even.
- Choose the Right Paint: Use a high-quality spray paint or acrylic paint for a long-lasting and professional finish. Make sure to choose a paint that is compatible with your chosen surface and technique.
- Sanding: Before painting, lightly sand the surface of the tin can to remove any imperfections and create a smooth surface for the paint to adhere to.
- Multiple Coats: Apply multiple thin coats of paint instead of one thick coat for a more even and professional finish.
- Drying Time: Allow sufficient drying time between coats and before handling the tin can to prevent damage to the paint.
- Sealing: For a more durable finish, consider sealing your painted tin can with a clear varnish or topcoat.
- Experiment with Techniques: Try out different techniques like stenciling, stamping, or sponging to add texture and interest to your tin can decoration.
- Add Details: Embellish your tin can with details like glitter, sequins, or beads for a personalized touch.
By following these tips and techniques, you can achieve a professional-looking finish when decorating tin cans. With a little bit of creativity and patience, you can create beautiful and unique decorations that will add a personal touch to any room in your home.
Encouraging Creative Exploration and Expression
Embarking on a decorating journey with tin cans provides a blank canvas for artistic expression. It is an opportunity to unleash your creativity and explore new techniques. The following tips will encourage you to delve into your imagination and experiment with different ideas to create a truly unique piece of art.
- Experiment with various mediums: Paints, markers, and crayons all have different textures and colors, and using a combination of these mediums can add depth and dimension to your artwork. Don’t be afraid to try new things and see what works best for you.
- Create layers: Layering different designs and patterns can add complexity and interest to your artwork. Try overlapping shapes, or adding texture and dimension with 3D elements like beads or buttons.
- Consider the size and shape of the tin can: The size and shape of the tin can can greatly affect the overall look and feel of your artwork. Consider the dimensions of the can and how they can be used to create balance and harmony in your design.
- Use different techniques: From brush strokes to sponging, there are countless techniques you can use to add texture and interest to your artwork. Don’t be afraid to try new techniques and see what works best for you.
- Get inspired by nature: Nature is a great source of inspiration for artwork. Look for patterns and colors in nature that you can incorporate into your design. Consider using natural elements like leaves, flowers, or stones to add depth and interest to your artwork.
- Be playful: Decorating tin cans is a fun and playful activity. Don’t take yourself too seriously and have fun with it! Let your imagination run wild and see where it takes you.
By following these tips, you will be encouraged to explore your creativity and experiment with different ideas, resulting in a truly unique and personalized piece of art.
FAQs
1. What kind of paint should I use to decorate tin cans?
There are many types of paint that you can use to decorate tin cans, including acrylic paint, spray paint, and oil paint. Acrylic paint is a popular choice because it is easy to work with and dries quickly. Spray paint is also a good option if you want to cover a large area quickly. Oil paint can be used, but it takes longer to dry and may not adhere well to some surfaces.
2. Can I use Mod Podge to decorate tin cans?
Yes, you can use Mod Podge to decorate tin cans. Mod Podge is a type of glue that is often used for decoupage and other craft projects. It can be used to glue paper, fabric, and other materials to tin cans, and it can also be used to seal and protect the surface once it is dry.
3. Can I use markers to decorate tin cans?
Yes, you can use markers to decorate tin cans. Markers are a convenient and easy-to-use option for decorating tin cans. You can use permanent markers or fabric markers, depending on the surface and the type of design you want to create. Be sure to choose markers that are labeled as safe for use on metal surfaces.
4. How do I prepare the tin can for decoration?
Before you start decorating a tin can, it is important to prepare the surface. This may involve cleaning the can with soap and water or using a deglosser to remove any gloss or shine. You may also need to prime the surface with a layer of paint or other material to ensure that the decorations adhere well. Be sure to follow the instructions on any products you use to prepare the surface.
5. Can I decorate the inside of a tin can?
It is generally not recommended to decorate the inside of a tin can, as it can be difficult to reach and the surface may not be suitable for decoration. If you want to decorate the inside of a tin can, you may need to use a different type of material or surface, such as paper or fabric.