Are you tired of throwing away empty cans or storing them in a corner of your room? Why not turn them into works of art? Decorating empty cans is a fun and creative way to recycle and upcycle. It’s a great activity for kids and adults alike, and the best part is that you can customize the design to fit your personal style. In this article, we’ll show you how to decorate empty cans using various materials and techniques. From painting and drawing to using found objects and stickers, we’ll give you inspiration and ideas for transforming those plain old cans into something beautiful and unique. So grab some supplies, get creative, and let’s start decorating!
Choosing the Right Cans for Decoration
Factors to Consider
When it comes to decorating empty cans, there are several factors to consider to ensure that you have the right materials for your project. These factors include the material, size, shape, and embellishments of the can.
- Material: The material of the can is an important factor to consider when decorating. The most common materials for cans are aluminum and tin, but there are also plastic and glass containers that can be used for decoration. Aluminum cans are lightweight and durable, making them a popular choice for decorating. Tin cans are also a good option, as they are sturdy and have a classic look. Plastic and glass containers are not as commonly used for decorating, but they can be a good choice for projects that require a clear or transparent container.
- Size: The size of the can is another important factor to consider. The size of the can will determine the amount of space you have to work with when decorating. Larger cans provide more space for decoration, while smaller cans may require more creativity to make them stand out.
- Shape: The shape of the can is also an important factor to consider. Round cans provide a classic look, while rectangular cans can be a good choice for projects that require a specific shape. Square cans can also be a good option, as they can be easily transformed into a variety of shapes.
- Embellishments: The embellishments you choose for your can will also play a big role in the final look of your project. Embellishments can include things like stickers, paints, glitter, and more. Choose embellishments that complement the material, size, and shape of the can.
Suggested Cans for Decoration
When it comes to decorating empty cans, there are several options to choose from. Here are some of the most popular cans that are perfect for decoration:
- Aluminum cans: These are the most commonly used cans for decoration. They are lightweight, durable, and have a smooth surface that makes them ideal for painting, drawing, or applying stickers. They are also recyclable, which makes them an eco-friendly option.
- Tin cans: Tin cans are another popular option for decoration. They have a metallic surface that can be painted or decorated with stickers. They are also durable and can be used for a variety of projects.
- Plastic bottles: Plastic bottles are a great option for decoration, especially if you want to create a project that can be used for storage. They come in a variety of sizes and shapes, and can be decorated with paint, stickers, or decoupage. They are also lightweight and easy to work with.
Overall, when choosing cans for decoration, it’s important to consider the project you have in mind and the materials you have available. Aluminum cans, tin cans, and plastic bottles are all great options that can be used in a variety of ways to create unique and beautiful decorations.
Gathering Supplies and Tools
Essential Supplies
- Paint: Paint is an essential supply for decorating empty cans. You can choose from a variety of paint colors to match your desired design. It is important to use a paint that is safe for metal surfaces and that will adhere well to the can. Acrylic paint is a popular choice for this purpose.
- Paintbrushes: Paintbrushes are necessary for applying the paint to the can. There are many different types of paintbrushes available, including bristle brushes, foam brushes, and sponge brushes. Choose a brush that will allow you to create the desired effects and that is suitable for the type of paint you are using.
- Mod Podge: Mod Podge is a glue that is specifically designed for decoupage and other craft projects. It is perfect for attaching stickers, ribbon, and other embellishments to the can. It can also be used to seal the can once it is finished.
- Stickers: Stickers are a fun and easy way to add decoration to the can. You can choose stickers that match the theme of your project or that have a personal meaning to you. Be sure to choose stickers that are safe for use on metal surfaces.
- Ribbon: Ribbon is another simple but effective way to add a decorative touch to the can. You can use ribbon to tie around the can, or to create a bow or other design on the surface. Be sure to choose a ribbon that is suitable for the type of paint or glue you are using.
- Glitter: Glitter is a fun and sparkly embellishment that can add a lot of personality to the can. You can sprinkle glitter on top of the paint, or use glitter glue to create a more controlled design. Be sure to choose a glitter that is safe for use on metal surfaces.
Tools
- Sandpaper: Sandpaper is a crucial tool for decorating empty cans. It can be used to smooth out rough edges, remove any rust or dirt, and create a surface that is ready for paint or other decorative materials. There are different types of sandpaper available, such as fine, medium, and coarse, and each type is suitable for specific tasks. For example, fine sandpaper is ideal for smoothing out small areas, while coarse sandpaper is useful for removing heavy rust or paint.
- Paint scraper: A paint scraper is a tool that is used to remove old paint from surfaces. It is an essential tool when preparing an empty can for decoration. The paint scraper can be used to remove any remaining paint from the can, making it easier to apply new paint or other decorative materials.
- Foam brush: A foam brush is a versatile tool that can be used for a variety of decorating tasks. It is ideal for applying paint or other decorative materials to curved or hard-to-reach areas of an empty can. The foam brush is also useful for creating textured designs or adding details to the decoration.
- Utility knife: A utility knife is a sharp tool that can be used for cutting or trimming materials. It is an essential tool when decorating empty cans, as it can be used to cut labels or stickers from the can, or to trim excess material from the decoration. The utility knife can also be used to create intricate designs or cut out shapes from paper or other materials.
Preparing the Cans for Decoration
Cleaning the Cans
- Remove labels: Before you start decorating the empty cans, it is essential to remove any labels that are still attached. This can be done using a sharp utility knife or scissors. Carefully cut around the label, being careful not to damage the paint or metal surface of the can.
- Remove rust: If the cans have rust on them, use a wire brush or steel wool to remove it. Start by scrubbing the rust off with the wire brush or steel wool, then use a rag to wipe away any residue.
- Wipe with a damp cloth: Once the labels and rust have been removed, use a damp cloth to wipe down the cans. This will remove any dirt or debris that may be left over from the rust removal process. Be sure to use a clean cloth and wipe down the entire surface of the can, including the edges and corners. Allow the cans to dry completely before moving on to the next step in the decorating process.
Priming the Cans
Apply Primer
Priming is the first step in preparing empty cans for decoration. It involves applying a layer of primer to the surface of the can to ensure that the paint or other decorative materials adhere properly. There are various types of primer available, including oil-based, water-based, and acrylic primer. It is essential to choose a primer that is compatible with the type of paint or material you plan to use for decorating the cans.
Let it Dry
After applying the primer, it is crucial to let it dry completely before proceeding with any further decoration. The drying time for primer varies depending on the type of primer used, but it typically takes several hours to dry completely. It is recommended to check the manufacturer’s instructions for specific drying times.
Sand if Necessary
Once the primer is dry, it is essential to inspect the surface of the can for any imperfections, such as bubbles, blemishes, or uneven areas. If any imperfections are found, it may be necessary to sand the surface lightly before applying another layer of primer. This step helps to create a smooth and even surface for the decorative materials to adhere to. It is essential to use a fine-grit sandpaper to avoid gouging the surface of the can. After sanding, it is crucial to wipe away any dust or debris before proceeding with the next step.
Decorating the Cans
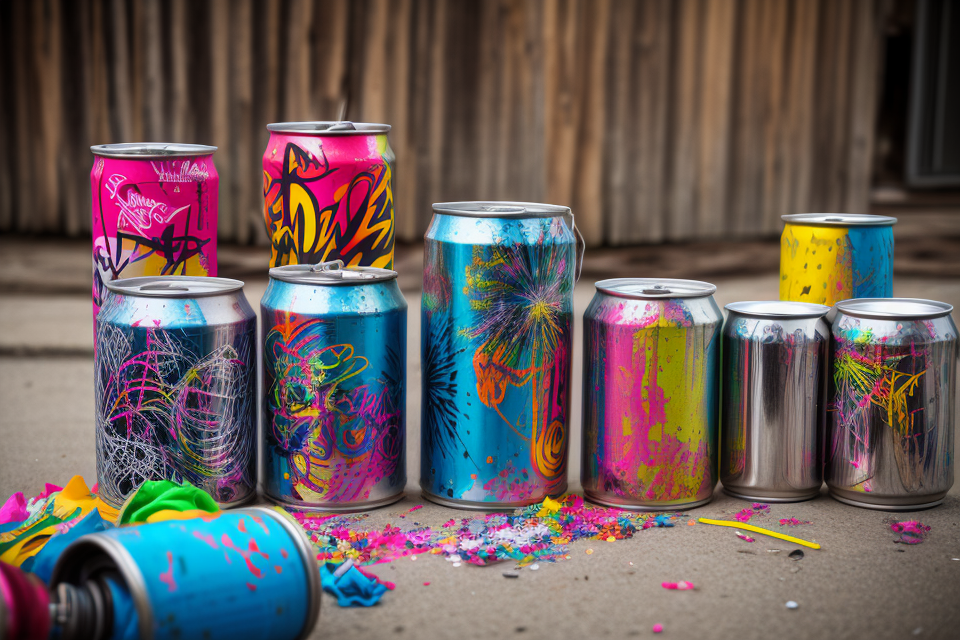
Painting the Cans
Choose a Design
The first step in painting your empty cans is to choose a design. You can let your imagination run wild and come up with your own unique design, or you can look for inspiration online or in craft books. Some popular designs include abstract patterns, landscapes, and quotes.
Apply Paint
Once you have chosen your design, it’s time to start painting. Use acrylic or spray paint for best results. If you’re using acrylic paint, make sure to prime the can first with a white base coat. This will help the paint adhere better and make the colors more vibrant.
After you have finished painting your can, it’s important to let it dry completely before moving on to the next step. Depending on the type of paint you used, this could take anywhere from a few minutes to several hours. Be patient and let the paint dry completely before continuing with the next step.
Applying Decals and Stickers
Applying decals and stickers is a simple and fun way to decorate empty cans. This method is great for those who want to add a pop of color or a graphic design to their cans. Here are the steps to follow:
- Clean the area: Before applying any decal or sticker, make sure the surface is clean and free from any dirt, dust, or debris. This will ensure that the decal or sticker adheres properly and looks neat.
- Choose the decal or sticker: There are many options available when it comes to decals and stickers. You can choose designs that match your personal style or the theme of your event. Consider the color, size, and shape of the decal or sticker before making your final decision.
- Apply the decal or sticker: Once you have chosen your decal or sticker, gently remove it from its backing and place it on the surface of the can. Make sure to align it properly and smooth out any air bubbles. Let it sit for a few minutes to ensure that it adheres properly.
- Let it dry: After applying the decal or sticker, let it dry completely before moving or handling the can. This will prevent any damage to the design and ensure that it stays in place.
With these simple steps, you can create a unique and personalized design for your empty cans. Applying decals and stickers is a great way to add a pop of color or a graphic design to your decorations, and it’s a fun and easy way to unleash your creative side.
Adding Embellishments
Decorating empty cans with embellishments is a great way to add some pizzazz to your home decor. There are a variety of embellishments that you can use to personalize your cans and make them stand out. Here are some ideas to get you started:
- Glitter: Glitter is a fun and easy way to add some sparkle to your cans. Simply apply a thin layer of glue to the surface of the can, sprinkle on some glitter, and let it dry. This will give your cans a shimmery, glamorous look.
- Ribbon: Ribbon is another simple and effective way to add some flair to your cans. You can tie a ribbon around the middle of the can, or use it to create a bow on the lid. This will add a touch of elegance to your decor.
- Personalized touches: To make your cans truly unique, consider adding some personalized touches. You can use stickers, decals, or even paint to add your name or initials to the can. This will give your decor a personalized, customized look.
These are just a few ideas for adding embellishments to your empty cans. The possibilities are endless, so get creative and have fun with it!
Tips for a Professional Look
- Use multiple coats of paint
When it comes to achieving a professional look when decorating empty cans, using multiple coats of paint is a crucial tip to keep in mind. Applying multiple coats of paint allows for better coverage and a more even finish. It’s important to note that when applying multiple coats, it’s best to let each coat dry completely before applying the next one. This will ensure that the paint adheres properly and doesn’t have any bubbles or wrinkles.
- Choose complementary colors
Another important tip for achieving a professional look when decorating empty cans is to choose complementary colors. Complementary colors are colors that are opposite each other on the color wheel, such as blue and orange or red and green. When using complementary colors, it can create a visually appealing and harmonious look.
- Apply evenly
When decorating empty cans, it’s important to apply the paint evenly. This can be achieved by using a paint roller or a brush to cover the entire surface of the can. It’s important to make sure that the paint is applied in a consistent manner, without any streaks or missed spots. If the paint is applied unevenly, it can create a messy and unprofessional look.
Finishing the Cans
Sealing the Cans
After completing the painting or decoupage, it is essential to seal the cans to protect them from any damage and make them more durable. Here are the steps to seal the cans:
- Apply Mod Podge: This is a water-based, non-toxic, and environmentally friendly sealant that is perfect for sealing painted or decoupaged surfaces. Apply a thin layer of Mod Podge over the entire surface of the can using a brush or a foam roller. Make sure to cover all the edges and corners.
- Let it dry: Allow the Mod Podge to dry completely, which usually takes about 30 minutes to an hour. The drying time may vary depending on the humidity and temperature of the environment.
- Sand if necessary: If there are any bubbles or imperfections on the surface, use a fine-grit sandpaper to smooth out the area. This step is optional, but it will help create a more even and professional-looking finish.
Once the cans are sealed, they are ready to be used or displayed as decorative pieces. Sealing the cans is an essential step in the decorating process, as it protects the artwork and extends the lifespan of the cans.
Displaying the Cans
Displaying the cans can be a creative way to showcase your work and add a touch of elegance to your home. Here are some ideas for displaying the cans:
- Group them together: One way to display the cans is to group them together in a vase or bowl. This can create a stunning centerpiece for your table or a statement piece for your living room.
- Use as a centerpiece: Another way to display the cans is to use them as a centerpiece for a special event or gathering. You can fill them with flowers or other decorations to add some extra flair.
- Display in a specific order: You can also display the cans in a specific order to create a unique arrangement. This can be done by color, size, or any other criteria that you choose.
Storage Tips
- Store in a dry place: Empty cans should be stored in a dry place to prevent rusting and other forms of damage. This is particularly important if you plan to keep the cans for an extended period of time. It’s also a good idea to keep them away from direct sunlight, as this can cause the paint or other decorations to fade over time.
- Stack carefully: When stacking decorated cans, it’s important to be careful not to damage the decorations or the cans themselves. It’s best to stack them flat, with a soft material like a cloth or paper towel between each layer. This will help prevent scratches or dents on the cans and ensure that the decorations remain intact.
- Label for identification: To keep track of your decorated cans, it’s a good idea to label them for identification. You can use a permanent marker to write the date, the decoration technique, or any other relevant information on the label. This will make it easier to find the cans you need when you want to use them for a specific project or to display them in your home.
FAQs
1. What materials do I need to decorate an empty can?
To decorate an empty can, you will need a few basic materials such as paint, stickers, fabric, glue, and markers. You can also use materials like beads, sequins, and pipe cleaners to add more texture and depth to your design.
2. Can I use any type of paint to decorate an empty can?
Yes, you can use any type of paint to decorate an empty can. However, it’s important to choose a paint that is suitable for your chosen surface. For example, if you want to paint a metal can, you should use a paint that is specifically designed for metal surfaces.
3. How do I prepare the empty can for decoration?
Before you start decorating your empty can, it’s important to clean and prepare the surface. Remove any labels or residue from the can using rubbing alcohol and a cloth. Then, sand the surface lightly to create a smooth, even surface for your paint or other decorations.
4. Can I decorate an empty can with stickers?
Yes, you can decorate an empty can with stickers. Simply clean the surface of the can and apply the stickers according to the manufacturer’s instructions. You can also layer multiple stickers to create a more complex design.
5. How can I make my decorated can more unique?
There are many ways to make your decorated can more unique. You can add embellishments like beads, sequins, or pipe cleaners to add texture and dimension to your design. You can also try using different paint techniques, such as sponging or dripping, to create a more interesting pattern. Additionally, you can experiment with different color combinations to create a truly one-of-a-kind design.