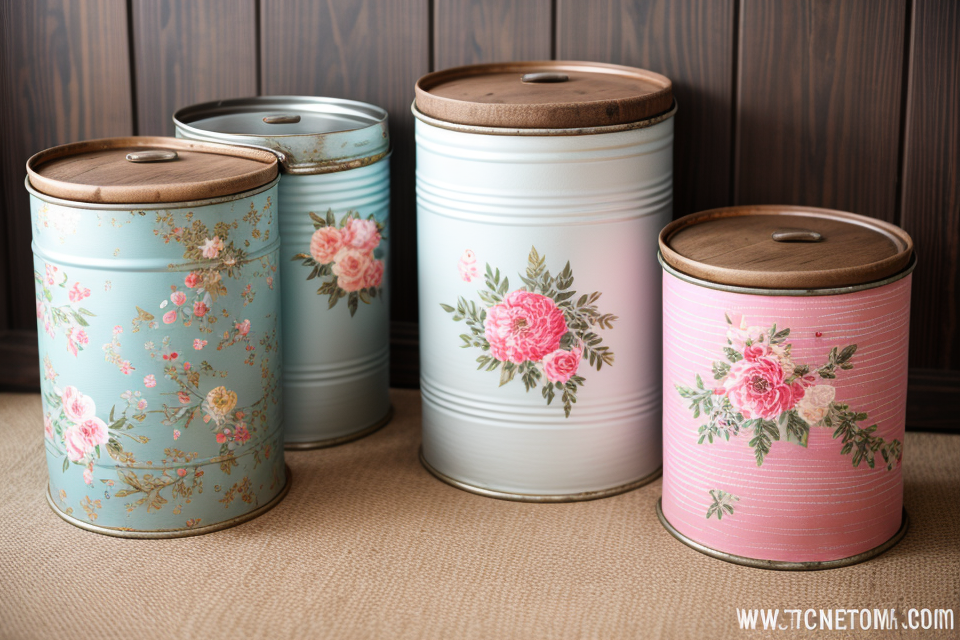
Are you looking for a unique and creative way to cover your tin cans? Look no further! In this guide, we will show you how to cover tin cans with fabric to create a personalized and stylish look. This is a great project for those who enjoy DIY crafts and want to add a touch of creativity to their home decor. Follow our step-by-step instructions and learn how to create customized tin can covers that will impress your friends and family. So, let’s get started and add some fabric flair to your tin cans today!
Choosing the Right Fabric for Your Tin Can Cover
Factors to Consider
When choosing the right fabric for your tin can cover, there are several factors to consider. These include:
- Durability: The fabric should be durable enough to withstand the weight of the tin can and any potential damage that may occur during use. Consider fabrics such as denim, canvas, or heavy cotton.
- Compatibility with the tin can size: The fabric should fit snugly around the tin can to ensure it stays in place. Measure the diameter of the tin can and choose a fabric that is wide enough to accommodate it.
- Color and design: Consider the color and design of the fabric to match or complement the product inside the tin can. This can help create a cohesive and appealing overall look for your customized tin can cover.
Recommended Fabrics
When it comes to creating customized tin can covers with fabric, there are several options to choose from. Here are some recommended fabrics that are perfect for this project:
Canvas
Canvas is a durable and versatile fabric that is ideal for creating tin can covers. It is a tightly woven fabric that is able to withstand a lot of wear and tear, making it perfect for use in projects that will be handled frequently. Canvas is also a great choice for customization, as it can be easily painted or printed on to create unique designs.
Denim
Denim is another durable fabric that is perfect for creating tin can covers. It is a thick and sturdy fabric that is able to withstand a lot of wear and tear, making it ideal for projects that will be handled frequently. Denim is also a great choice for customization, as it can be easily painted or printed on to create unique designs.
Cotton
Cotton is a soft and lightweight fabric that is perfect for creating tin can covers. It is a breathable fabric that is able to stretch, making it ideal for projects that need to fit around curved surfaces. Cotton is also a great choice for customization, as it can be easily painted or printed on to create unique designs.
Fleece
Fleece is a warm and cozy fabric that is perfect for creating tin can covers. It is a soft and plush fabric that is able to trap heat, making it ideal for projects that will be used in cold environments. Fleece is also a great choice for customization, as it can be easily painted or printed on to create unique designs.
In conclusion, there are many different fabrics that can be used to create customized tin can covers. Some recommended fabrics include canvas, denim, cotton, and fleece. Each fabric has its own unique properties and benefits, so it’s important to choose the right fabric for your specific project.
Preparing the Tin Can for Covering
Cleaning the Tin Can
Before starting the process of covering the tin can with fabric, it is important to clean the tin can thoroughly. This step ensures that the fabric adheres properly to the surface of the tin can and that there are no dirt or debris particles that may affect the final outcome.
To clean the tin can, you will need a soft cloth, warm water, and mild dish soap. Start by wiping down the tin can with the soft cloth and warm water to remove any dirt or debris particles that are visible on the surface. If there are stubborn stains or marks, you can use the mild dish soap to gently scrub the surface of the tin can.
Make sure to rinse the tin can thoroughly with clean water after scrubbing to remove any soap residue. Once the tin can is clean and free of any dirt or debris, you can proceed with the next step of preparing it for covering with fabric.
Measuring the Tin Can
Proper measurement is crucial to ensure that the fabric cover fits the tin can perfectly. Here are the steps to follow:
- Remove the label: Before taking any measurements, carefully remove the label from the tin can. This will prevent any distortion of the can’s shape during the measuring process.
- Measure the diameter: Use a measuring tape to measure the diameter of the tin can at its widest point. Write down this measurement for future reference.
- Measure the height: Measure the height of the tin can from the bottom to the top. This measurement will be used to determine the size of the fabric needed for the cover.
- Measure the circumference: Measure the circumference of the tin can at its widest point. This measurement will be used to cut the fabric for the cover.
- Take notes: Write down all the measurements taken, including the diameter, height, and circumference. This information will be useful when purchasing the fabric and cutting the cover.
By following these steps, you will have accurate measurements of your tin can, which will ensure that the fabric cover fits perfectly.
Cutting the Fabric
Before starting the process of covering the tin can with fabric, it is essential to prepare the fabric by cutting it to the correct size and shape for the tin can. This step is crucial as it ensures that the fabric fits the tin can perfectly, resulting in a neat and professional-looking finished product.
To cut the fabric, follow these steps:
- Measure the dimensions of the tin can: Measure the height, width, and depth of the tin can to determine the correct size of the fabric required. Make sure to take into account any additional features such as handles or lid.
- Cut the fabric to size: Once you have determined the size of the fabric required, cut it to the appropriate dimensions using scissors or a fabric cutter.
- Shape the fabric: Depending on the shape of the tin can, you may need to shape the fabric to fit the contours of the can. For example, if the tin can has a rounded bottom, you may need to cut the fabric into a curve to fit the shape of the can.
- Ensure the fabric is the correct shape: Before moving on to the next step, double-check that the fabric is the correct shape and size for the tin can. If necessary, adjust the fabric to ensure it fits perfectly.
By following these steps, you can ensure that the fabric is cut to the correct size and shape for the tin can, resulting in a customized cover that looks professional and well-made.
Attaching the Fabric to the Tin Can
Method 1: Wrapping the Fabric Around the Tin Can
Step-by-step instructions for wrapping the fabric around the tin can:
- Start by cleaning the tin can with a damp cloth to remove any dirt or debris.
- Measure the dimensions of the tin can and cut the fabric to the appropriate size.
- Fold the fabric in half and place it on a flat surface with the folded edge facing up.
- Place the tin can on top of the fabric, aligning the edges.
- Use scissors to cut along the folded edge of the fabric, creating a hem.
- Carefully remove the fabric from the tin can, making sure not to stretch or damage the fabric.
- Wrap the fabric around the tin can, smoothing out any wrinkles as you go.
- Adjust the fabric as needed to ensure it is evenly wrapped around the tin can.
- Once the fabric is in place, use strong adhesive, such as hot glue, to secure it to the tin can.
- Allow the adhesive to dry completely before handling the tin can cover.
Method 2: Sewing the Fabric onto the Tin Can
Step 1: Prepare the fabric and tin can
- Choose a fabric that matches the design or theme of the event or occasion. Cut the fabric to the desired size, slightly larger than the tin can.
- Clean the tin can with soap and water to remove any dirt or debris.
Step 2: Mark the fabric and tin can
- Place the fabric on a flat surface and place the tin can on top of it.
- Use a pencil to mark the outline of the tin can on the fabric.
Step 3: Sew the fabric onto the tin can
- Using a sewing machine, sew along the marked outline of the tin can on the fabric. Be sure to use a strong thread that can withstand the weight of the tin can.
- Once the fabric is securely attached to the tin can, trim any excess fabric.
Step 4: Add any additional details
- If desired, add additional details such as embroidery, buttons, or other decorative elements to enhance the design of the tin can cover.
- Allow the cover to dry completely before attaching it to the tin can.
Step 5: Attach the fabric to the tin can
- Slide the fabric cover over the tin can and press it down firmly to ensure a snug fit.
- If necessary, use hot glue or a strong adhesive to secure the fabric cover to the tin can.
By following these steps, you can create a customized tin can cover that is not only stylish but also functional. Whether you’re looking to create a unique gift or decoration, this method of sewing the fabric onto the tin can is a simple and effective way to achieve a professional-looking result.
Choosing the Right Fabric Attachment Method
When it comes to attaching fabric to a tin can, there are two primary methods to choose from: wrapping and sewing. Each method has its own set of benefits and drawbacks, so it’s important to consider your options carefully before deciding which one to use.
- Wrapping the Fabric
- This method involves covering the entire tin can with fabric, leaving no gaps or seams visible. It’s a great option if you want a smooth, uniform look and don’t mind spending a bit more time on the project.
- To wrap the fabric around the tin can, you’ll need to first cut the fabric to the correct size, then use a glue or adhesive to secure it in place. Make sure to follow the manufacturer’s instructions for any adhesive you use, and be careful not to apply too much or it may wrinkle the fabric.
- Wrapping is a good choice for simpler designs or if you want to cover up any imperfections on the tin can.
- Sewing the Fabric
- This method involves attaching the fabric to the tin can using thread and needle. It’s a good option if you want more control over the final look of your cover and are comfortable with sewing.
- To sew the fabric onto the tin can, you’ll need to first trace the shape of the can onto the fabric and cut it out. Then, using a needle and thread, sew the fabric onto the tin can along the edges, leaving the top open. Once you’ve sewn all the way around, you can turn the cover right-side out and use pins to keep it in place while you finish the top.
- Sewing is a good choice if you want to create more intricate designs or if you want to show off the texture of the fabric.
Consider the amount of time and effort you’re willing to put into the project, as well as the final look you’re going for, when deciding which method to use.
Finishing Touches
Applying Mod Podge or Other Sealant
- Mod Podge is a water-based glue that works well for bonding fabric to tin cans.
- Apply a thin layer of Mod Podge to the top of the fabric cover, spreading it evenly with a brush or your finger.
- Allow the Mod Podge to dry completely, following the manufacturer’s instructions for curing time.
- Once the Mod Podge is dry, the fabric cover should be waterproof and more durable.
- Alternatively, you can use other sealants such as clear nail polish or spray varnish to achieve the same results.
- Make sure to choose a sealant that is safe for use with fabric and will not yellow or damage the cover over time.
Adding Embellishments
Adding embellishments to your customized tin can cover is a great way to add a personalized touch to your design. Here are some ideas for embellishments you can use:
- Buttons: You can use small buttons to add a pop of color or a decorative element to your tin can cover. You can choose buttons that match the fabric you used for the cover or ones that complement it.
- Ribbons: Ribbons can be used to add a touch of elegance to your tin can cover. You can tie a ribbon around the edge of the cover or use it to create a bow on top.
- Lace: Lace can be used to add a delicate and feminine touch to your tin can cover. You can use lace trim or a lace doily to add a layer of texture to your design.
- Beads: Beads can be used to add a sparkly and glamorous touch to your tin can cover. You can use small beads or bead garlands to create a unique design.
- Paper flowers: Paper flowers can be used to add a whimsical and playful touch to your tin can cover. You can use construction paper or scrapbook paper to create colorful and fun flowers.
These are just a few ideas for adding embellishments to your customized tin can cover. The possibilities are endless, so feel free to get creative and experiment with different embellishments to find the perfect finishing touch for your design.
FAQs
1. What type of fabric should I use to cover tin cans?
There are many types of fabric that can be used to cover tin cans, such as cotton, canvas, burlap, or any other durable fabric. The choice of fabric will depend on the desired look and use of the tin can cover. For example, if the tin can will be used for storing food, you may want to choose a fabric that is food-safe and washable.
2. How do I prepare the tin can for covering with fabric?
Before covering the tin can with fabric, it is important to clean and dry the can thoroughly. Any moisture or dirt on the can can affect the adhesion of the fabric. You can also choose to paint or decorate the tin can before covering it with fabric, to add extra protection or design elements.
3. How do I attach the fabric to the tin can?
There are several methods for attaching the fabric to the tin can. One simple method is to use fabric glue or a strong adhesive to attach the fabric directly to the tin can. You can also use wire or thread to stitch the fabric around the edges of the can, or use metal grommets or eyelets to create a hole for threading a cord or rope through to tie the fabric securely around the can.
4. Can I use a different material to cover the tin can, besides fabric?
Yes, there are many other materials that can be used to cover tin cans, such as paper, plastic, or even metal. The choice of material will depend on the desired look and use of the tin can cover. For example, if you want to create a waterproof cover for a tin can that will be used for storing liquids, you may want to choose a plastic or metal material.
5. Can I customize the design of the tin can cover?
Yes, you can customize the design of the tin can cover by choosing different colors, patterns, or materials for the fabric, or by adding embellishments such as buttons, ribbons, or stickers. You can also choose to paint or draw on the fabric before attaching it to the tin can, to create a unique design. The possibilities are endless!